
This dearest friend, Michelle, asked me for my bread recipe. I have a basic wheat-blend bread recipe that I make weekly. It is the bread we use for toast, sandwiches and, well, whatever else you use basic slices of bread for. Since Michelle asked, I decided to not be boring and give her messy written instructions. A better way to share a recipe is to blog about it. So here I am. Blogging. And if you can follow a simple recipe, you can make bread for you and your family. It seems like a pain but once you get the hang of it, you can get really fast at the process.
If you try this and get the bread bug here is a good site that has instructions on how to make ANY bread you want! The Fresh Loaf. Give it a try. Start small. The first time you smear a warm piece of fresh bread with butter and honey, you will be addicted.
So here you are Chelley. Hope you make and eat lots of bread. Then we can have matching butts. Love you!
Start with 1-1/3 cups warm water. I said warm. Not hot or cold. Warm.

Add 2-1/4 tsp dry yeast or 1 package if that's how you roll. (get it? roll!! hahaha)

Here is the creative part. You need 1/4 cup food for the yeast. Sugar, honey, molasses, dried milk, whatever makes you happy. This is beautiful. It's winter honey from the farmer's market in Roswell. It is made from cotton and wheat! Very dark and very strong flavor. Better for making bread than for eating in my opinion. *warning-I am giving you the actual recipe. I never use that much sweetener. I just give a nice squeeze of honey or a big drop of molasses and it turns out great. I don't like the finished product to be too sweet!

You can, mix it all together in a mixer or you can mix it by hand. The bread doesn't care. But you do need to make sure you proof it. Proofing basically means that you let the mixture sit in a warm spot to give the yeast a chance to prove it's worth. It gets all frothy and it smells like fermentation. Fermentation is perfection. I let it sit at least 10 minutes but the longer you leave it the more flavor it will produce. If it doesn't froth and look like dirty dishwater, your yeast might be dead. It's nice to figure this out before you bake a hard little bread-brick instead of a fluffy loaf of bread. Don't skip this step!

After the proofing add 1-1/4 tsp of salt. Sea salt or kosher salt, whatever. Just don't use iodized salt. It's nasty.

Add 1/4 cup of canola oil. I have never used any other oil but I am sure you could.

Keep mixing while you add the first of the flour. Start with 2 cups of whole wheat flour. Mix it in a half cup at a time to get a smooth mix. Then add 1 cup of unbleached white flour. Keep mixing until the dough forms a sticky ball.

Now the fun part. You can use the dough hook in your mixer. But then you don't get to feel the dough. I dump out the sticky mass onto a board or counter top that is covered with about 1/4 cup unbleached, white flour. Cover the top with another 1/4 cup of the flour.

Begin kneading. You can add flour bit by bit as you need it. If it gets sticky add a little. But keep in mind that a wetter dough will make a more moist bread.

When you can press into the dough and feel an elastic spring and see that it shrinks back on itself. It's ready to rise.

Hide your dough baby under a CLEAN towel. Let it rise for an hour and a half or until doubled.

When it's finally risen enough, you get to punch it! Use your fist to punch out the air until the dough is flat. Let it rest while you grease a bread pan.

At this point, you can just roll the dough up into a loaf and put it in a pan. I like the looks of a twisted loaf. So this is what I do. I split the dough into two equal parts.

Then I roll the dough between my hands to create these log-type thingies.

Anchor the tops together.

Then begin to twist the pieces.

Squish the ends down so it will fit in the bread pan. It won't be perfect and that's okay. One side might be thicker than the other or the twist might smash together. Don't worry. It will taste terrific.

Hide your new fancy bread baby under a CLEAN towel. Preheat the oven to 350. Let the loaf rise for an hour. It should nicely fill the pan. Don't let this rise go too long. If you do, it might fall (flatten) when you bake it. This is also the point when you might want to egg-wash the top and add a pretty sprinkling of sesame seeds, salt, flour or oats. Let yourself go wild. I will do that when I feel the urge. But more often than not, I just let it be.

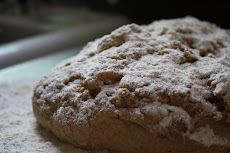
This is the most lovely risen loaf ready to bake.

After 38 minutes in the oven, (it is supposed to be 40 but I don't want it to get dry) you can dump the loaf out to cool. Wait a bit before you cut the bread or it will smash when you cut it. It is torture I know but you don't want to ruin it!

I hope this makes you all want to try your hand at bread-making. It's a skill that can become a hobby that can become a love! Happy eating!


9 comments:
You are my inspiration, Rachelle! I have always wanted to make homemade bread, but it is so very intimidating. Thanks for the step-by-step -- even if it WAS for my sister! :-)
Oh, so pretty! Love it! I'm hoping to get back to working on my bread baking skills this winter-that's awesome you make this every week!
Wow, thanks for that lesson, that's great I might try some tomorrow and the pics were great. I might need to learn how to write a blog. While we were in the hospital I had several people ask me to write a blog, but me growing up with the dinosaurs don't know about that new techno stuff!!
I love this! i can't wait to try it. I've never made bread like this (at least I don't think so...not without the help of my mom's bread maker, haha). I make pizza dough, naan and other breads, but not sandwich bread! Can't wait to try it out!
Oh Adrianne, if you can make all of that stuff, you can definately make this!!!
Oh dear...I definitely did something wrong, ha. I had to end up rolling it into little breadsticks and I have NO idea how they'll turn out. I'll let you know! Maybe my yeast is dead??? Need to figure out the problema.
Hi, I just had my first slice of your bread and it is yummy. I kneaded mine in my bosch mixer and before letting it knead I added 2 tablespoons grounded oatmeal and 2 tablespoons grounded sunflower seeds to give it more yummy flavor. I was wondering though if the top of your bread is hard? Mine is and I am not sure how to fix that.
Is it hard like crunchy or hard like a brick? I am not an expert but if it's hard-crunchy, it might be the oven temp was too high or the cook time was too long. If it's a hard like a brick it might have not gotten a chance to rise all of the way. Tough to say not being able to see it myself! But I say crunchy bread is never a bad thing! Dip it in something delicous and munch on! :) Glad you are making bread. Isn't it fun?!
made this today!! along with some homemade jam...what a yummy treat!! thanks!
Post a Comment